Controlling how much light reaches your camera sensor is an important decision for expressing your creativity. You know you have an idea in mind to take a picture, but can that idea be the end result if you don’t know how to meter light?
There is a difference in having a proper exposure and having the result of your creative mind printed on paper. You want more than just a picture that “turned out ok”? Then you need to understand metering modes, and understand how your camera “thinks”, what is the camera trying to tell you and what kind of information you need to give the camera.
So let’s take a look at metering modes and how they work, so you can select which one to use in different situations of light.
As cameras keep getting more and more sophisticated and more computer “thinking” is added to them, we have more precise ways of metering light. Today, we have , multi-pattern metering (called matrix or evaluative), center-weighted averaging metering, partial metering, and spot metering.
The metering system is nothing more than a microprocessor inside your camera, like a mini computer. In this processor, you have a big database of pictures and charts with information about those pictures so the camera can compare the light you have available and the settings in your camera to those stored pictures and suggest you the “proper“ exposure.
When you point the camera to a subject and half press the button, your exposure level indicator will show up in your viewfinder, where you see a number zero and some dots and/or sticks moving constantly to the left and to the right. As you point to different subjects, you see those sticks moving. They are trying to tell you if you have too much light or if you don’t have enough light, so that you can adjust your camera controls until you have a proper exposure, being “proper” an average exposure that reads ZERO in those “sticks, numbers and dots of your viewfinder, or a bar that stays green UNDER the ZERO mark.
Your goal for proper exposure is to get those dots and sticks in the zero mark. When it is in the zero mark, your camera understands that for an average scene, the colors will turn out right, and you will have good light for the scene. That is known for what the camera considers 18% gray, that is, the camera averages all the tonal values (the brightness levels of everything in shade, in sun, all the colors in the scene, etc) and translates that into an “average” amount of light, that is set by the manufacturer as the “proper” exposure level as 18% gray. Once your metering system is under the zero in your camera, it is like the “correct” exposure will bring out all the colors right: red will be red and not pink, yellow will be yellow and not orange, and all the other colors should be right.
Don’t get too confused with 18% gray. It is just a number so you understand how the camera “thinks”. It will not show up on your camera in any place. It is mere information so you can look it up online for more detailed information of how camera understands colors and tonal values.
Now, have in mind that not all situations of light will have colors, brightness and contrast turn out all good all the time. The camera microprocessor will interpret the light in 3 different ways, depending on the metering system that you pick.
Multi pattern, or evaluative, or matrix metering system (the multi pattern gets different names with different camera manufacturers) - this system divide the overall scene in little pieces and assigns each piece a brightness value. Then it takes in consideration the lens you are using, the ISO, the aperture, and the shutter speed you have set in your camera and compares all these with the database stored in the microprocessor until it finds a stored situation of light that is similar. Then, it will suggest a metering “solution” by blinking in your viewfinder in the left side or in the right side of the zero, meaning you need to adjust the exposure by changing your shutter speed or your aperture until your metering bar is in zero. This system is great when the light is coming from behind you and when you have lots of colors in the scene. A general purpose metering mode. Good for portraits and street photography with tricky light, it will give you accuracy and proper exposure about 80% of the time.
Center-weighted averaging metering system - a system that interprets light by giving “weight, to some part of the scene more than others. So the camera reads the light from all parts of the scene and assigns 70% of the light from the center of the frame and 30% of the light from the edges (numbers that can also be 60% to the center and 40% to the edges, 75% to the center and 25% to the edges, 80% to the center and 20% to the edges, depending on the manufacturer preset. What it means is that it will average a reading considering that whatever is inside the center of the frame is more important than the other outside of the center of the frame. This metering system is better for contrasty situations of light, backlight and pictures in which white or black subjects are NOT in the center of your picture. If white or black are in the center, your chances of having an overexposed or underexposed pictures will increase dramatically, since the camera is trying to turn everything “gray” for average good color rendition. Also great for side lighting when you have lots of shadows in the scene, as an end of the day street picture.
Partial metering system - a system that interprets light assigning 6.5%, 9% or 10% of your viewfinder area at the center as important for the metering results, depending on the model of the camera. That means once you have picked your CENTRAL point of focus (let’s say you are pointing to the eye of your model to meter light), the camera will consider the area between 6.5 to 10% around it to “suggest” you the “proper” exposure, ignoring everything else in the scene for metering purposes. That means it would not matter if you are photographing someone with very light skin with a black wall behind: the camera will only read the light off the eye (and around the assigned area from 6.5 to 10%, depending on your camera) to give you the 18% grey “proper” exposure. A great system to pick if you have a lot of backlighting much brighter than your subject in the foreground. The meter won’t be fooled by lighter or darker scenes around your subject with this system. It is mostly center weighted. It will meter off the CENTER point of focus, so you may need to recompose your scene after you lock exposure to take the picture.
Spot metering system - a very precise metering mode. In Canon systems that could be approximately 3.8% CENTER, ignoring everything else in the metering. Your metering needs to use the CENTER focus point to meter off the scene, then you lock exposure and recompose the picture using whatever focus point - or manual focus- you want to select, but keeping the original metering from your CENTER focus point. The spot metering is great for when you photograph bright colors or when you want very specific metering ignoring almost all the rest of your composition. That means if you are photographing a person against the window (with bright sun behind the person) and you spot meter the person using your CENTER focus point in the eye of the person, you will have a metering for exposing to the face. Then you lock your exposure in that metering- meaning you don’t change your aperture or shutter speed - and recompose the scene with another auto focus point or manual focus and take the picture. The background (the light behind the person) will be blown out much brighter than the person. If that is the effect you want, SPOT METERING is great for this situation. Spot metering requires that you really understand the metering and know exactly what end result you want, often meaning you need to adjust/compensate the exposure toe the brighter or darker side, depending on the result you want from the picture.
When picking which metering system to use, take into consideration the situation of light you are at: low light, side light, front light, backlight. Also, pay attention if there is a very large area of the frame filled with darker tonal values.
When you have snow, you need to compensate your exposure to the PLUS side, meaning you need to overexpose your scene at least one F/stop or your snow will be dark grey. It happens because when you are metering a person in snow, the metering system is seeing all the snow around the subject and “thinking” “it is too bright!”, hence suggesting you need to adjust to a darker exposure. But you know the camera is trying to make everything 18% gray, so you need to overexpose the metering to turn snow white, and not gray. So every time you have lots of white in a scene, use your “suspicious” meter and adjust your exposure to the PLUS side, unless you don’t care about the large white part of the scene being darker than it looks.
The same thinking applies to dark colors being most of your frame: you need to compensate the exposure to the MINUS side, so you don’t have your blacks being too light. Black is DARKER than gray, so you need to UNDEREXPOSE at least ONE f/stop for a correct exposure for darker tones.
Hope this metering talk guides you towards better pictures.
Monday, January 12, 2009
Thursday, July 24, 2008
Emotion as your source of work
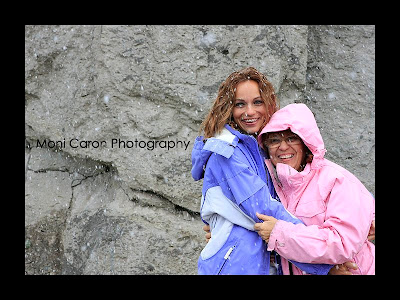 My mom and sister, seeing snow falling from the sky, in the San Juan Mountains, for the first time in their lives, May 22, 2008, while we were going to Monument Valley.
I've been through lots of emotions this year.
My family (mom, middle sister Lisi, and step dad came to visit me). We did more than 2000 miles while they were here and saw more than they could possibly dream seeing in such short time (Lisi stayed 2 weeks, parents stayed 3).
Above all, what remarked me the most was the connection we had. I knew that. They knew that, but yet, saying goodbye was the hardest thing ever. It always is when half of your heart goes aways when you say bye.
While my family was visiting, I learned I have friends who are more family than friends. I learned they accept me for who I am. I learned I love them more than i think I possibly could. I learned that I AM and I CAN BE much more. I can be anything I want. I can create new dreams in my head and heart and go chase them!!
Eventually, I learned a little more about being a photographer and being a better person. I learned that being a photographer is not only about capturing that beautiful landscape at the sunrise, or the beautiful smile of my sister and wise look of my mom. It is that too, but it is much more than that.
I learned that sometimes, when you have a picture that is meaningful it is really hard to really tell WHY. I realized sometimes I like it because of the beauty. Sometimes I like it because of the angle. Sometimes I like it because of the light. Sometimes I like it because of the composition.
Sometimes I like it because of the story it tells, or even because of the story behind it, when i took it, or wonder what happened when someone took a picture, what was the story behind it.
But most of all, the reason why I photograph is emotion.
A photograph not only tells a story without words, it is also capable of causing emotion, stirring your own memories from inside - and sometimes old memories by association). A photograph is about a story you lived, someone else lived, and the story that will come after. The never told story.
Emotion is what stirs me. Passion. Happiness. Mood. Sometimes introspective days. Emotion is what this assignment will be about. Tell me a story. Tell me how you thought about it. Why did you pick the subject, how did you produced it. What were you trying to say? Or, did you capture the emotion, or did the emotion captured you?
The interpretation is part of the assignment.
Deadline is August 10, 2008. Go live and photograph :)
Monday, April 14, 2008
My way of showing love: public
Monday, April 7, 2008
LOVE comes from the heart - Deadline: April 20, 2008.
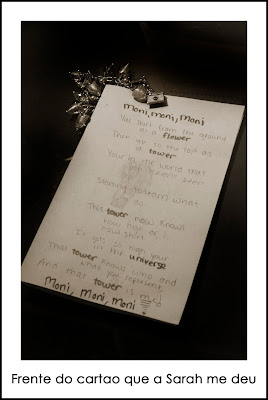 Translation of the caption: front of the card that Sarah gave me :)
Even when we don;t pay attention, the most beautiful images either come from long planning or long love. By that, I mean that we, photographers, are always making decisions of what to photograph, where to spend the time to photograph and what is worth taking the picture. By creating an image of a subject we love, we automatically become better photographers, when compared to the task of photographing something we don't care about or are not really interested about.
Landscape photographers research sunrise and sunset times. Then, they plan a specific time of the year to visit the place. Not once, or twice, but many times. Whatever it takes to create the image they have in mind. Yes, They come back again, again and again, until one day they capture the right angle, the right light, the perfect composition, just as in their mind.
Macro photographers pick up a theme and create an environment of light in such a way to get us to see what even the naked eye can't see. With their cameras, a tripod and the right light, in studio or outdoors, they perfect the details, explore many angles of their "mini" subject and share a work that few people would have the patience.
Wedding photographers don't work with the luxury of "time", but rather need to work under pressure of the one chance to do it right. The bride will only walk the aisle once. And there will be only one first kiss once they are married.
The photographer needs to anticipate what is going to happen and find the most effective way to connect with the bride, the groom, and the guests. When that happens, the images and the story of the wedding can be told.
Portrait photographers work with families and children who not always "follow" direction.
They capture a special moment in those families. the have a time frame to get their clients to relax, be themselves and interact with one another and be able to capture their personalities.
With technical skills - but above all people skills - they need to make those images meaningful and eternal.
Sports photographers barely have a game time to capture all the action and get them to the newspapers and magazines on time for Internet or next day's news.
All these photographers have different subjects and specific goals based on the needs of their market or wishes of their souls. However, they all have something on common: it's all a work of heart.
That's it, the big secret, I believe: the best images always come from the heart.
It could have taken 1/250 of a second to see and capture that loving look, and 1/1000 to get the football player scoring touchdown, or 1/60 of a second to get the groom looking at his wife for the first time as "his" wife for now and ever. Eventually, we all capture what we care about and love the most.
So in this assignment, I propose you share LOVE. Do something from your heart. Put your heart into it. Deeply. Tell me a story, in one or more images. Show me what you love to take pictures of or show LOVE itself (or convey LOVE somehow).
Isn't about love that life is all about??? I'd say YES!
Thursday, March 13, 2008
What do you all think of this crop?
Sunday, March 9, 2008
 ISO 100
F 2.8
SS 500
This is a shot I took of my son and his girlfriend yesterday. I tried to do sun flare shot but wasn't too happy with this one. I would like harsh critisism on this one please. I shot them all at f 2.8 and regret it. I have seen is done before with a couple but it didn't work for me.
Anyway, here is my tilted crop assignment.
Look forward to your cc.
Wednesday, March 5, 2008
Tilted Crop
Monday, March 3, 2008
Not tilted but I thought it was funny
Moni's tilted Crop
Canon 40D
Lens: Canon EF 24-70 L f/2.8 @ 70mm
ISO 200
Aperture:F 14.1
Shutterspeed:1/50
Spotmetering
So I went with my freinds to this little old town called Manitou Springs, CO to spend the afternoon doing street photography. Thought it could be interesting to create a new tilted crop to share here.
If you want to see more, here is the link to this fun afternoon:
The link to all the photos is http://www.monicaron.com/manitoustreet/index.htm
Thursday, February 28, 2008
Tilted Crop - Deadline: March 9
How many times you have seen beautiful photographs that for some reason made you stop and say “wow”??
I don’t know about you , but me, I tend to look around and admire lots of different photographers and the more I look, the more I refine my own vision.
To throw some perspective or shake things up in your mind a little, I would like to talk about the angle you take photographs.
As a general rule, the camera is wider than taller and I’ve read somewhere that 90% of the photographs taken are horizontal. To make it worse, the majority of the images we see online are taken from the height level of whomever is taking the photograph. That makes sometimes nice images. Sometimes. Lots of times, however, makes them to be too obvious or too predictable.
What makes us wow an image are a little beyond a logical explanation.
It could be because it reminds you an amazing image you have seen before. OR maybe some image you always had in your mind and didn’t get the chance to create. OR just because you felt angry, disturbed, bored…you will try something different. Yes, that s more like it!!
Shaking the obvious out of your mind will most likely create some weird and not so perfect image, but in the end of this creative day , you will have an assignment that will get you somewhere where you have not been yet…create something you have not tried yet. For pure fun.
The art of using deliberately the tilted crop is strange at first. IT breaks the rule of “normal” and makes things more interesting because you are not expecting to see things from that perspective.
And quite honest, it is so cool to be able to just try things in another way. Had that been in the “film” age, and we all would be thinking of how much money and time this assignment or learning would cost us. Being digital though allows us to experiment more and try things more often. And if we don’t like it, we can always go and do it again. Just delete in the computer.
That‘s learning too.
So the assignment this month is to try a different perspective. Tilt your mind, will you?
I suggest to compose, frame your image as you would normally would. Then, tilt the camera to the left or to the right, step on a bench or lay on the floor and then recompose and take your picture!
Tilted crop is a very nice exercise to play with new angles and new way of seeing things. Just pretend for a day you are a 5 year old child and you don’t know exactly how you are supposed to hold the camera and take the picture. Cut things out, get close and experiment with a very different tilted crop.
If it makes you feel more inspired, go online and research tilted crop, different angles on photography, and anything that can get you motivated.
Then try a still life, a person, whatever you feel like, using tilted crop in your composition. Then, share!
Wednesday, February 27, 2008
THIS WEEKS ASSIGNMENT
Ok, I am no Moni but I will post the next assignment. I am not good with words and direction so you are all on your own with this one.
Assignment: "Tilted Crop"
This can be an in camera crop or a photoshop crop. From what I have read, there is certainly a limit on how far to take your crop. You don't want your subject to look like they are falling out of the photo or to look un natural.
Have fun and we will see your posts by next Sunday. Remember to leave comments on the posters photos. This is all about learning and making us better photographers.
I apologize for my simple post, maybe Moni will come and save the day.
Good luck and have fun shooting
Kathleen
Thursday, February 21, 2008
Macro
Okay so i really wanted to do this challenge and not pull from my archives, but alas it is almost the end of Feburary and I have not gotten around to taking any intresting Macros. I will try to replace this when i can take a decent macro!
So this is a water droplet caught in the end of my plant. ISO 400, ss 1/8, f5.6 taken with the cheap tripod i have (I need another ) and my remote.

So this is a water droplet caught in the end of my plant. ISO 400, ss 1/8, f5.6 taken with the cheap tripod i have (I need another ) and my remote.
Wednesday, February 20, 2008
Macro attempt
Ok, to start, I don't have a macro lens. I use my 85mm 1.8 lens with my 50mm 1.8 held in reverse in front of it inside the lens hood. This results in a dark outer circle but you can either crop out the center or leave it for effect. This also results in an extremely shallow dof, probally best to shoot very flat things this way. Anyway, I gave it a go and this is what I got.
Used light meter to get a reading of iso 100, f22, ss 15
light from behind coin through a window, and slightly to camera left.
Tripod and a shutter release were also used.
Same set up as above for this one.
It is a gear that winds the strings
on a guitar.
This was taken in front of the same window
on a diferent and not so bright day.
iso 100, f22, ss 1.3
tripod and shutter release cable used here too.
Saturday, February 16, 2008
Macro Photography Project
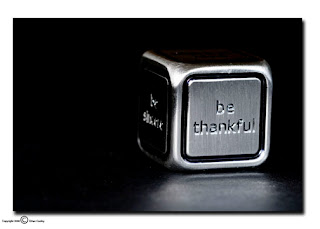
f/7.1
ISO 200
Manual
Focal Length:100.0mm
Lens: 100mm f2.8 Macro USM
Flash Fired (-2/3)
Time:12:03pm
Metering:Partial
Temp: 5300k
Tripod
Adobe Camera Raw/PhotoshopCS3
Sunlight coming through window behind camera. Black matte board underneath. Object one of a set of metal dice (measures 3/4" x 3/4").
I wanted to capture the dramatic sayings on the dice, but not put them just in a "middle space" of the photo, so I set the die off to the side of the framing. I also wanted to emphasize the message as much as possible, so I tried to get only that message to pop out (by getting the natural sunlilght to shine on that part of the dice).
The dice are given to participants at my work (Center for Creative Leadership), and you can role the dice to come up with different "thoughts" or "ideas" for the day. This saying caught my attention and is very powerful unto itself.
Thursday, February 14, 2008
Water drops
I thought I would share this link for water drops Marco style. Hope you all enjoy!
http://ilovephotography.com/forums/index.php?showtopic=271326&hl=macro
http://ilovephotography.com/forums/index.php?showtopic=271326&hl=macro
Subscribe to:
Comments (Atom)
